Showing posts with label Glitter. Show all posts

Friday, 11 January 2013

Review | Barry M Dazzle Dust

Hey Everyone!

After much umming and arring over the Barry M counter in Superdrug for the last few weeks, I decided to pick up Barry M Dazzle Dust in Bronze for £4.49.
small tub with black lid and gold powder contents
The reason I had been apprehensive to buy the eye shadow was the loose nature of its consistency- I had visions of it going everywhere at the slightest movement. However, to my relief, the powder stays firmly in its pot and even on application there is little fall out (as long as you're careful!)
underside of pot with gold contents reading 'Barry M Dazzle Dust 44'
opened pot of shimmery bronze powder with black lid stood up next to it
The packaging is cute and simple, allowing you to see the colour of the shadow through the tub and holding a good amount of product but being dinky enough to take up almost no room in your makeup bag. It has a beautiful bronze colour; consisting of dense copperish powder with gold/metallic glitter flecks. I didn't think this colour alone was very flattering on my eyes as it was a little orange, so I blended in some matte brown which toned it down. The colour is massively pigmented- meaning a little goes a long way and it balances even with a bold lip.
close up of intensely shimmery gold powder in pot
close up of girls face looking down wearing orange gold shimmery eyeshadow all over lid and red lipstick
I think this is a lovely product for a party or evening out and is great value for money. I definitely want to try out other shades!

What are your recommendations?
green and pink floral text with brown outline reading 'Julz'

Thursday, 23 August 2012

NOTD 6 | Solid Glitter

Hey Everyone!

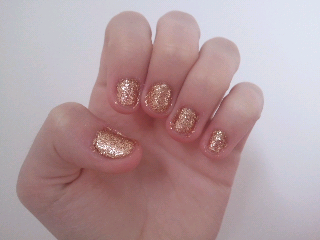
As you might know from reading this post and this post, I am head over heels with glitter nail polish. When I was in Barcelona I saw that Claire's were having a big sale so I decided to pick up some of their glitter polishes. I picked up the solid gold, red with gold flecks and black with silver flecks and they were €2 each and so far the gold is my absolute favourite. I like to do two coats of gold glitter then Maybelline Express Finish as a top coat.
white hand with really short nails painted in gold glitterhand with gold glitter nails holds gold glitter and clear nail polish bottles
The thing I love most about this nail polish its opacity. Unlike the Topshop glitters (which I now think are just a top coat for a hint of glitter), two coats of this and your nail is solid glitter. I think its amazing and absolutely love when it catches my eye and I'm like ooh pretty! Its also the perfect gold colour, they've really got the metallic spot on; its not orangey or brown at all. In addition, the brush is really easy to work with. Its square which works well with my short nails and it picks up heaps of the glitter. The consistency is verging on thick but surprisingly its not gloopy and again, applies well and dries within a few minutes. The great thing about glitter nail polish is that it barely chips, and this lasts at least 3 days without peeling which I think is great. Also, unlike many glitter nail polishes, this doesn't feel rough to touch, especially with the topcoat. 

Rating: 10/10 
Yep- top marks for Claire's glitters- from the excellent payoff to the tiny price tag, I can't find any faults with this little bottle of wonder!

Have you tried any of Claire's glitter nail polishes? Which is your favourite?

Monday, 6 August 2012

DIY | Multicoloured Glitter Nail Varnish < £2

Hey Everyone!

Recently, I've been feeling pretty creative, and have so many craft projects I'm excited to try out (eg studding shorts, tie dying/ombre shorts) and one of my must DIYs was glitter nail polish. I saw a post (here) on The Beauty Department and decided that it seemed simple enough. Of course, being me, I kind of strayed from their guide and made up my own rules. 

What I used:
clear nail polish, set of 4 tubes of glitter - red, silver, gold and green - and sellotape
Large piece of paper (as a mat)
Small piece of paper (for funnel)
Sellotape
MUA Clear Nail Varnish £1
The Works 4 Assorted Glitter Tubes 99p

What I did:
hand holding mini funnel made by rolling small piece of paper together
Roll the small piece of paper into a funnel shape and secure with sellotape.
4 tubes of glitter with clear nail polish bottle opened with mini funnel sticking out, all sat on piece of A4 lined paper
 Remove the cap of the nail varnish and place the funnel in the top.
nail polish bottle with glitter in it, glitter containers in background, silver glitter sprinkled over paper
  Begin pouring in the glitter. I started with a cap full of each. As you can see, the silver glitter got away from me a little.
close up of nail polish bottle with green, red, gold and silver glitter inside
 Screw on the top of the nail varnish bottle and shake really well.
stroke of clear nail polish on white paper with trace of glitter through it
 As you can see, the glitter wasn't very dense at this stage- so add more!
Nail varnish bottle with green as prominent colour in top half but all shades of glitter throughout
 I had a bit of a problem with the green glitter kind of taking over, even though I had used them in equal quantities. Just judge how much of each colour to put in by how the bottle looks.
hand holds nail polish bottle with silver, gold, red and green glitter inside
 Shake, shake and shake some more.
black nail polish with multicoloured glitter on top
 Use the varnish. Even though I heaped the glitter into the bottle, I had to do quite a few coats for the nail to be covered. Note: I used a black base coat.
white bed cover with single black dot
The varnish was SUPER runny and I stained my bed applying it- argh!

I realise I should have probably stuck to the one colour- as the four mixed in together is a bit weird looking, but hey ho there's only one way to learn these things. Also, since I made this, the red and green glitter flecks seem to have dissolved into the varnish (must be some chemical they contain) so now its pretty much a silver and gold glitter polish. But hey- not bad for £1.99! 

Have you tried making your own glitter nail varnish? Any other DIY projects on the go?
green and pink floral writing with brown outline which says Julz


Wednesday, 27 June 2012

Polish Post 6 | Pink Ombre and Glitter

Hey Everyone!

I've been painting my nails a lot recently- experimenting with different techniques and colours and I've been happy to discover unlikely combinations of my collection. However, I'm terrible for biting my nails and picking my nail polish off- so much so that I can't keep a colour on my nails for more than a day. I realise that this must be doing my nails a lot of damage, so for the time being, I am going to leave them bare. While I'm doing that though, I'll post recent NOTD's. Though since I'm on this topic- does anyone have any suggestions of what to do to stop biting my nails and to strengthen them?

Anyway, onto the actual post and today's nails consist of 5 shades of pink and my topshop ice crush.
5 shades of pink nail polish from light to vibrant, burgundy nail polish and glitter nail polish
fingers each with a different shade of pink with glitter on top, thumb has all pinks blended together
To achieve the ombre (ish) effect on my thumb, I just painted stripes of colour adjacent to each other whilst the last was still wet and they seemed to just sink into each other and dry together. My fingers then correspond in descending order to the colours on my thumb, and I put a topcoat of glitter on every nail.
thumb with different shades of pink graduating from top to bottom with silver glitter top coat
I am in love with these- they're so pretty and girly! Also, pretty easy to create- no messing about with sponges or anything. 

Do you like them? Would you consider giving nail ombre a go?

Saturday, 9 June 2012

Nails | Polish Post 5

Hey Everyone!

I officially have a new favourite nail polish that I have been coating every colour with - Topshop's Ice Crush. I had been eager to try glitter polish for a very long time but was really confused as to which one to get as there are so many available now. I had heard many great things about the Topshop nail polishes, so I decided to give their glitter a go. They have pink, purple and silver, and I opted for the silver as I thought the glitter was more 'chunky' and the clear polish could go over any colour.
silver glitter nail polish bottle
As with all of Topshop's make up line, the packaging is super cute. I actually love this so much that for the first few days of having it I used it as decor simple because it was so pretty! It works amazingly with a variety of different colours, and as I mentioned, I love that there is a mixture of large flakes of glitter and small flecks. Another thing which I was really impressed with was the consistency- one coat of this will cover the nail in sparkle.
lilac nails with silver glitter top coat
pink nail polish with silver glitter
short nails with pale pink polish and glitter top coat
Apologies for my nails which are possibly in the worst condition in history. Mid years resolution-stop biting them!

Not only does the polish make your nails sparkle, it leaves a lovely shine as a top coat. Also, its holographic properties reflect the colour you're wearing so in a way it adapts to it. Overall, I am super pleased with this polish- its exactly what I was looking for and I am now desperate to try out more glitter nail polishes and more of Topshop's make up line!

Ice Crush is available in Topshop or online.

Do you like glitter polishes? Any recommendations for what I should buy next?